Hi, here we’re going to show you, how to create scanner shortcut on your desktop. Making a shortcut of an application in Windows is an effortless task, but some peoples don’t have an exact idea of how to get scanner shortcut (Icon) on desktop. We are giving you the step-by-step guide to making you understand how to get a scanner icon on your desktop.
The guide will be for Windows XP, Vista, 7, 8, 8.1, Windows 10 operating systems. You can apply these steps to get the Canon, Lexmark, Samsung, Dell, Epson scanner shortcut on your desktop.
How to Create a scanner shortcut on the desktop?
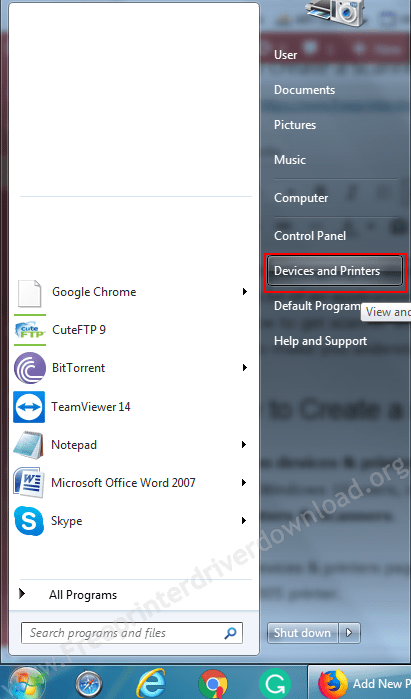
- Open devices & printers page – Click on Start Menu → Devices & Printers.
For Windows 10 users, click on Start Menu → Settings (Gear Icon) → Devices → Printers & Scanners.

- In devices & printers page, double-click on your printer. In my case, it is Laserjet m1005 printer.
- Right-click on Scan a document & pictures icon and then left-click on Create Shortcut.
Note: If you do not get this option, then we suggest you to please try method 2
- After that, you’ll get the scanner icon (shortcut) on your desktop named as: “Scan documents & pictures shortcut
If the above steps did not work for you, then try method2 from below.
Method 2: Make a shortcut of Windows Scan Utility on your Desktop.
You can easily scan your document using Windows Fax & Scan Utility. It is a default app that is built-in with the operating system. Here is the step-by-step guide on how to make a shortcut of Windows Scan utility.
Step 1: Navigate the following path: c:/Windows/system32. Change the drive letter according to where your operating system is installed.
Step 2: Right Click on WFS.exe file and go to “send to” option and then simply click on “Desktop (Create Shortcut)”. After clicked on that, the scanner shortcut on your computer has been created. Please see the following screenshots.
#screenshot1
#screenshot2
That’s it. Enjoy the trick.
I don’t know
Thanks.It helped