Sometimes Windows 10 users find their printing process blocked and showing this error message ‘Printer is in Error State’ message in the left-bottom corner. This message can come for all brands of printer namely Brother, Canon, Epson, Samsung, Ricoh, or Xerox etc.
Here, we are sharing a tested solution, which has resolved this problem for many users. Although, our troubleshooting guide has been applied on Windows 10 computer, but other operating system users can use the same methods shared below, such as Windows 7, 8, 8.1, 10, Windows server 2000 to 2019,
What does it mean that ‘Printer is in Error State’?
When you start appearing this message on your computer screen, it means the problem may be in your printer or in your computer.
Computer: On the computer, there could be many reasons behind that. Most probably it is related to misconfiguration the settings of permissions. Usually, it happens when a bad Windows update got installed on your computer. Sometimes, it happens due to corrupt the printer driver.
Printer: If the problem with your printer physically, then most probably it could be a hardware issue.
How to Fix Printer is in Error State?
First, try some steps to fix this issue. Check all printer cables and ensure that devices are connected properly, change USB ports and check wireless connections. Verify, ink level of the cartridge, if low, then refill it. Also, make sure that no paper is jamming your printer.
Even after doing all this your problem doesn’t get resolved, then read our troubleshooting guide given below.
Method 1: Update your Windows.
Sometimes such printer problem can occur due to improper Windows Update. The solution for this is very simple, just update your Windows It should fix the printer is in error state issue. If this trick doesn’t work for you then follow the next method.
- Click on the start menu button.
- Type Windows Update in the search bar.
- Click on found Windows Update in the given result above.
- Click on Check for Windows Update button.


- Follow its further on-screen instruction to complete the Windows update process. It will require to reboot the computers twice, so please allow it. We suggest you please don’t interrupt it in-between.
Method 2: Change Port Settings
- Press ‘Windows + R’ keys on your keyboard. Then, type ‘devmgmt.msc’, and press ‘Enter’. This will open Device Manager.
- Click on ‘View’ and select ‘Show Hidden Devices’.
- Do right-click the ‘Ports (COM & LPT)’ and click on ‘Properties’.
- In Properties window, click on ‘Port Settings’ tab and then select the radio button ‘Use any interrupt assigned to the port’ and tick the checkbox of ‘Enable legacy Plug and Play detection’. Then click on ‘Ok’.


- Now reboot your computer to check whether the problem is resolved or not.
If this doesn’t resolve your problem, then try reinstalling your printer.
Method 3: Reinstall the driver.
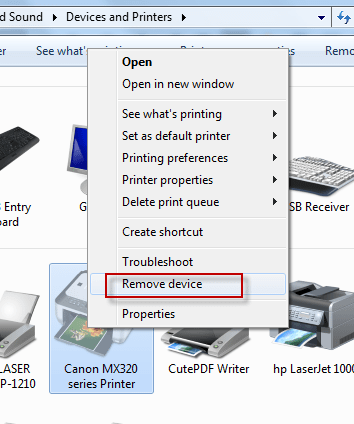
- Go to the ‘Control Panel’, then select ‘Devices and Printers’.
- Right-click on the printer name that you want to select and click on ‘Remove device’.


- After that, reboot your computer once.
- After the restart the computer, your computer will recognize your printer and install its driver automatically. If this doesn’t happen, then unplug and re-plug the printer with the computer.
If reinstalling your driver doesn’t solve your problem, then try resetting your print spooler.
Method 4. Reset your Print Spooler service
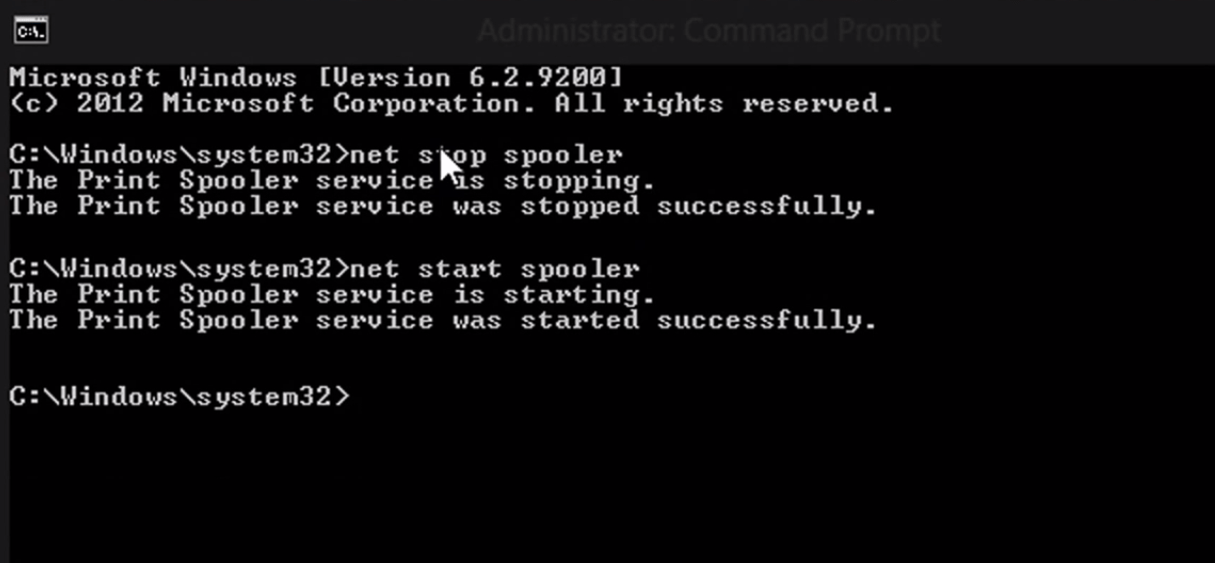
- Right-click bottom left side corner of the screen and select ‘Command Prompt (Admin)’.


- In command prompt window, type ‘net stop spooler’. Press ‘Enter’.


- Now, type ‘net start spooler’. Press ‘Enter’.


- Now restart your computer and see if your problem is fixed.
Hopefully, your printer issue has been resolved, but if it hasn’t, then try Windows Update to help fix this printer issue.

